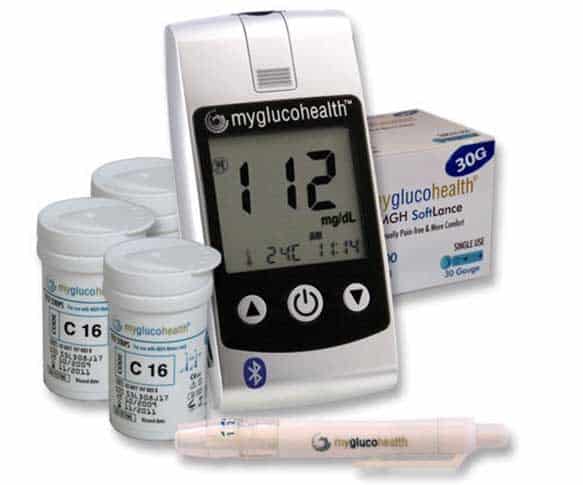
Blood glucose meters have been evolving along with the newest technological advances. As they continue to evolve, newer features such as Bluetooth connectivity. There are a few different types of glucose meters out there that offer Bluetooth features. The one we will discuss today is the My GlucoHealth Wireless by Entra Health Systems.
In this guide we’re going to discuss our review of how we felt the My GlucoHealth Wireless meter stands up against the competition.
What’s Included?
Let’s take a look at what is all included in your MyGlucoHealth Meter Kit:
- Wireless Glucose Meter
- USB Cable
- Carry Case
- Two AAA Batteries
- Get Started Manual
You can order the kit on Amazon. They offer the best deal.
Getting Started
One of the nice things about the MyGlucoHealth meter is that in case you have any questions or issues there is an instructional QuickStart video. It is a comprehensive learning tool that can guide you through the entire process of setting up your new wireless meter. It wasn’t too difficult to locate the video as it’s located at the Online QuickStart Resource section of the MyGlucoHealth website.
Let’s Discuss Accuracy
MyGlucoHeath Wireless Meter is considered to be one of the most accurate meters on the market today. When it was put to the test against laboratory results it performed higher than the recommended standards. With glucose concentrations of 4.2 or less, it tested with a +/- 6.5% of the laboratory results, within 90% of the time. 100% of the time it tested within +- 7.5%.
What Makes the Accuracy Different?
The MyGlucoHealth Wireless meter is calibrated using plasma. This is what makes the results of the meter more comparable to the laboratory HbA1c test.
For more diabetes related products see below:
Setting up the Meter
It’s really pretty straightforward to set up your meter. After pressing the power button, you will be asked to input the year using the up/down arrows and power button. Then the date and time needs to be inputted. After these few functions are completed, it’s time to learn more about what features your meter has in store for you. The video features a step-by-step guide to teach you how to:
- Set up your meter to communicate with your smartphone via Bluetooth Connectivity
- Upload test results to your smartphone
- How to properly use the lancing device
- Setting up a membership online account
- Uploading results to the MyGlucoHealth Portal using either a USB connection or Bluetooth
Alternative Testing
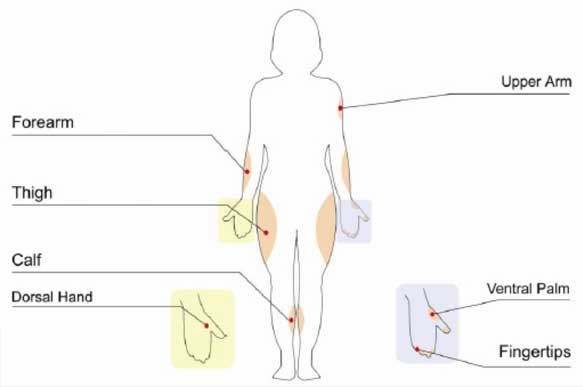
One of the nice features of the MyGlucoHealth lancing device is that it features alternative site testing. This allows you to save on your fingers by using other sites like your hand, palm, forearm, calf and thigh. It’s important to discuss with your doctor ahead of time to find out if alternative site testing is okay to do first.
Automatic Coding
The meter features auto coding. This means when a test strip is placed in the meter it will automatically know the code number to calibrate and set the meter properly. The auto coding feature helps to eliminate errors in testing and inputting.
Activity Selection
After you’ve placed blood onto the strip, you will hear a beep of the meter. You will then see the activity selection come up on the meter. This includes:
- After a Meal
- Before a Meal
- After taking Medications
- After Physical Activity
- Control Solution
Transmitting Results
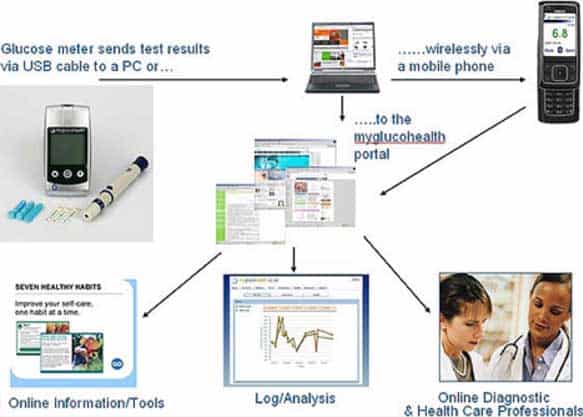
After the test completes, which only takes 3 seconds, you will get the option to review your results and then transmit them. You can send your results to the MyGlucoHealth Online Portal from your computer using a USB or a Bluetooth Connection. Or you will also have the option to use the MyGlucoHealth Mobile Application.
Result Memory
You can save and store up to 250 previous test results on the meter. This also allows you to take a look at your average blood glucose levels for either 7, 14 or 21 days.
MyGlucoHealth Online Portal
The online portal is a diabetes management system that provides you with a set of patient friendly comprehensive tools that allow not only yourself, but also your diabetes care team or family members to access it to help manage your diabetes.
The direct upload and transmission process helps to eliminate the need to log each test result manually online. This can help to improve your overall management, as it also helps to remove the possibility of human error in adding in results.
Within the online portal system, the readings are organized in a few different ways to help you take control of your diabetes management. You can also choose to send your results automatically to your care team as well as add in reminders or alerts which can be sent to you via text message or email.
Setting Up Your Portal
Once you receive your meter you will want to register for your online health portal and smartphone application. You will need to make sure you have the serial number from your meter handy as this will become important when registering. Depending on how you will transmit your data to the portal or application, you will want to pair your meter with your computer and/ or your smartphone via the Bluetooth connectivity feature.
The MyGlucoHealth portal also gives you the ability to send and even receive secure messages from your care team members, as well as reorder test strips.
Additional reading material:
Final Thought
Overall, we like some of the features of this meter. The ability to transmit data daily to the online mortal or mobile application is a nice enhancement. Before you make the switch, you will want to talk with your doctor and insurance company to see if this brand of testing strips and meter is approved for coverage. If you have to pay out of pocket, then this would not be an issue.
If you are someone that loves data and likes to stay on top of your diabetes management, then you may want to at least give this meter a try. You will gain a lot of valuable insight into what is taking place behind the scenes (in your body) with your diabetes management. Write your suggestions in the comments down below.
TheDiabetesCouncil Article | Reviewed by Dr. Sergii Vasyliuk MD on June 02, 2020

